Guide
Set Up Online Booking for Your Yoga Classes — A Step-by-Step Guide
How to set up a yoga class booking system from scratch — from creating classes and connecting payments to sharing your booking link and going live.
Most yoga teachers end up managing bookings the same way: a WhatsApp group, a spreadsheet, and a mental list of who’s paid. It works — until it doesn’t. Missed bookings, forgotten payments, no-shows with no record. The admin grows quietly until it’s taking more time than it should.
A yoga class booking system solves all of this. But choosing software is only half the job. The other half — the bit nobody writes about — is setting it up properly so it actually works for you and feels seamless for your clients.
This guide walks you through that part. Not which system to choose, but how to go from zero to live, with a real booking flow your clients can use today. Still evaluating options? See our yoga studio software comparison.
What Your Yoga Booking System Needs to Do
Before diving into setup, it’s worth being clear on what you’re actually trying to solve. A class booking system for yoga teachers has different demands from a generic appointment scheduler:
- Clients book and pay in one step — no chasing invoices after class
- Each class has a set capacity and closes automatically when full
- Clients get a confirmation instantly — no manual WhatsApp back-and-forth
- You can see, at a glance, who’s coming and who’s paid
- Over time, you build a client record without doing anything manually
Woven is built around this workflow. The steps below use Woven as the example throughout — but the preparation framework applies to any class booking software or online class booking system you choose.
Before You Start: What to Gather
Good setup takes under an hour if you come prepared:
- Your class details — names, dates and times, capacity per session, pricing, locations
- Your pricing model — drop-in rate, concessions? Price is set per class, so decide your standard rate upfront
- Business branding — your logo (PNG or JPG), a short bio, and your business description
- A Stripe account — Woven processes payments through Stripe. It’s free to create and takes five minutes
- A sharing plan — WhatsApp group? Instagram? Email list? Know where you’ll drop your booking link on day one
For a deeper look at choosing the right system, see our online booking system for small businesses guide.
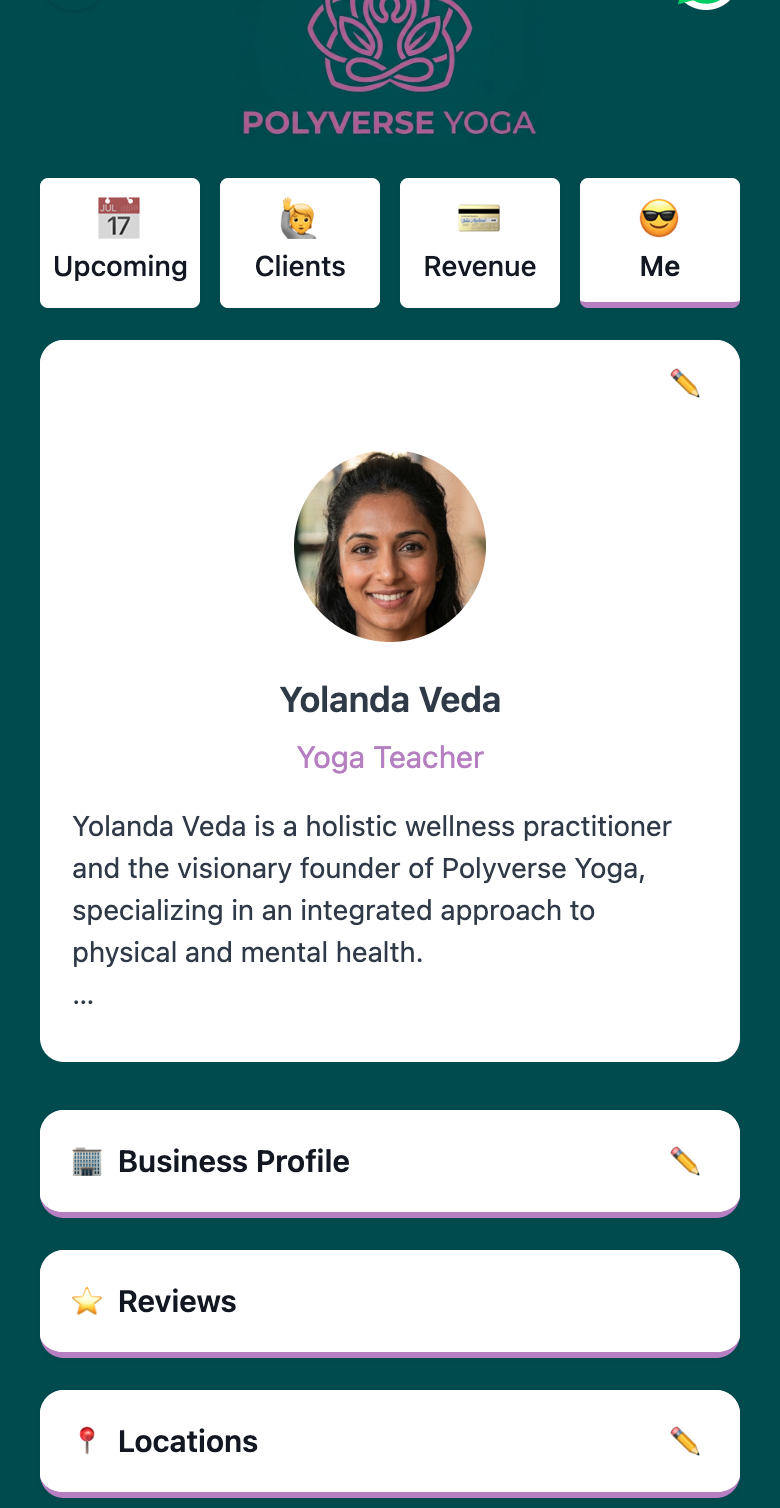
Step 1: Set Up Your Business Profile
Your business profile is your public-facing identity in Woven. It’s what clients see when they land on your booking page — your name, photo, bio, and business details.
From your Woven admin, go to the Me tab. Here you can add:
- Your name and bio — keep the bio human. One or two sentences about what you teach and your approach. This isn’t a CV; it’s a first impression.
- Your business name, description, and logo — your logo appears on class confirmation emails and your public page. Square format works best.
- Your locations — add any venues you teach at. Locations attach to individual classes so clients always know where to go.
- A tagline — a short phrase that captures what you’re about
For a full walkthrough of every profile field, see How to Set Up Your Business Profile.
Step 2: Create Your First Class
With your profile set, you can add classes. From your admin dashboard, tap the + button to open the new class form.
Fill in:
- Class name — this is what clients see on your public page. Be descriptive: “Vinyasa Flow — All Levels” beats “Yoga Class”
- Date and time — when the class starts
- Duration — optional, but clients appreciate knowing how long to allow
- Capacity — the maximum number of spots available
- Price — in pounds. Set £0.00 for free sessions; they go through the same booking flow without a payment step
- Location — select from your saved locations, or leave unassigned for online classes
- Description — optional but useful for classes with a specific focus or level
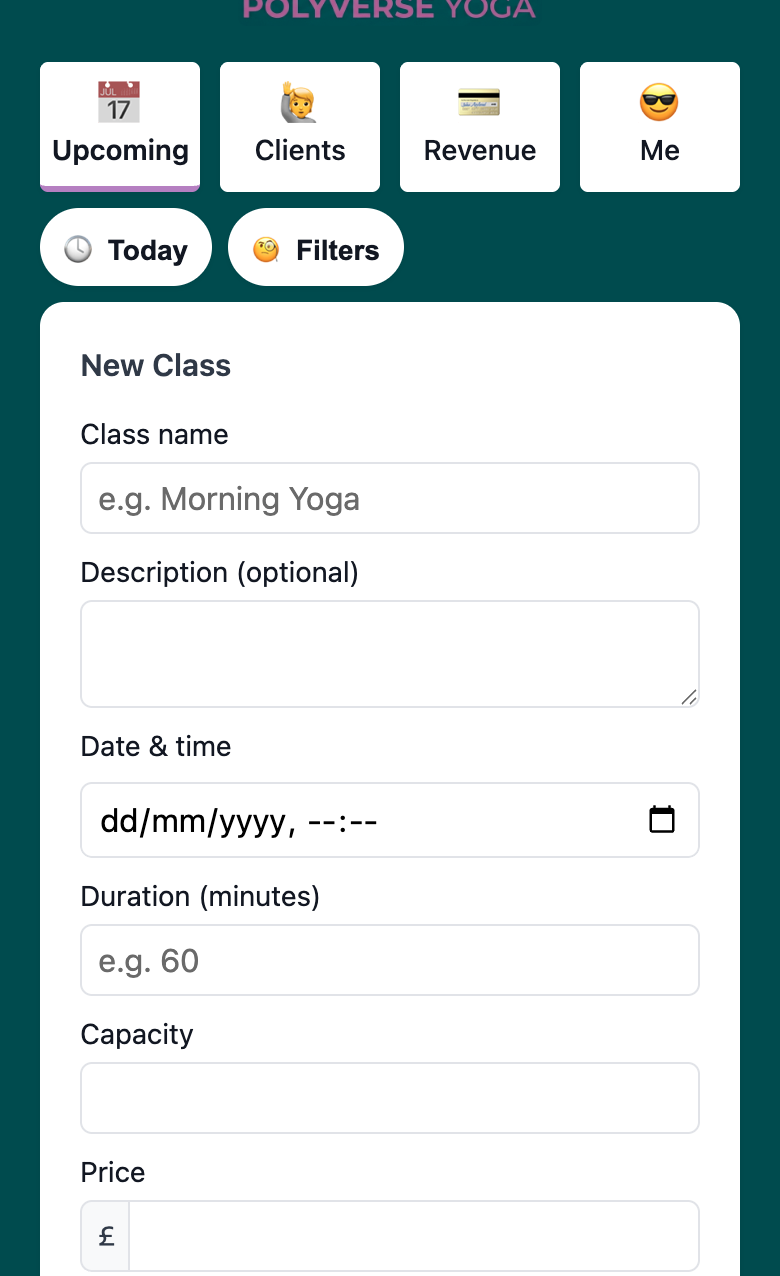
When you save, the class is created as a draft. It won’t appear on your public page yet — you control when it goes live.
Preview Before You Publish
Every draft class has a preview link in your admin. Use it. Open it on your phone, check how it reads, confirm the details are right. Your clients will see exactly this view when they tap your booking link.
Publishing a Class
When you’re happy, publish the class from the preview screen or the class detail view. Once live, it appears on your public page immediately and clients can book. You can still edit after publishing — name, time, capacity, price, description — changes take effect straight away.
For a complete guide to managing classes, see How to Create and Manage Classes.
Step 3: Connect Payments
Woven uses Stripe to process payments. If you haven’t set up Stripe yet, do it now — you’ll need it before any paid booking can complete.
Stripe is free to create. Go to stripe.com and follow the account setup. You’ll need to verify your identity and add your bank account for payouts.
Once your Stripe account is connected to Woven, payments are automatic: when a client completes the booking flow, Stripe handles the card charge and the money goes directly to your Stripe account.
🎉 What it costs: Woven charges a 1.5% transaction fee per booking, plus Stripe’s standard processing fees. There’s no monthly subscription — you only pay when clients book and pay. A quiet month costs nothing.
For full details on how payments work, statuses, and payment links, see Taking Payments for Classes with Woven.
Step 4: What Your Clients Experience
Before you share your booking link, run the flow yourself as a client. Here’s what they’ll see.
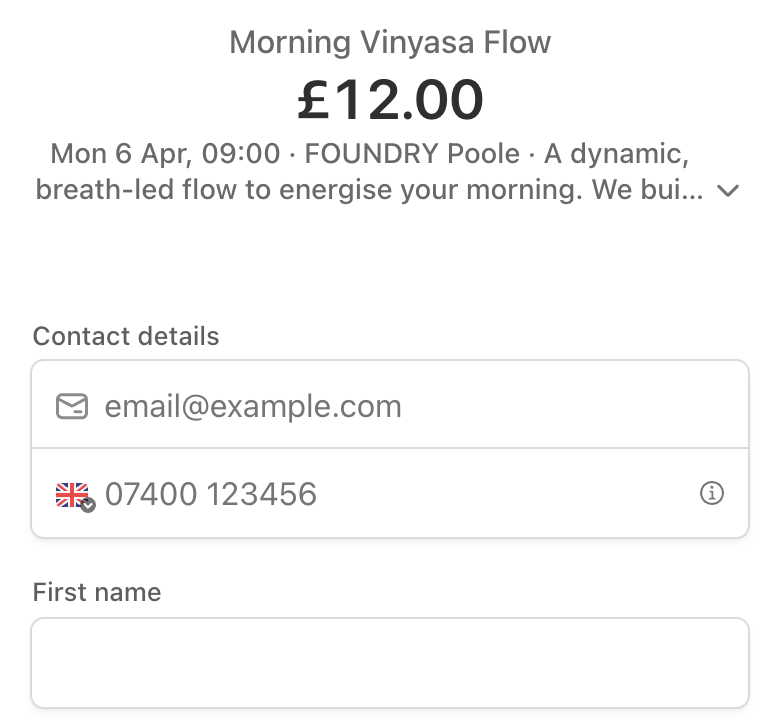
Every Woven business gets a public page — a clean, mobile-first page at a URL like thankswoven.com/marketplace/business/your-business. This is where all bookings start.
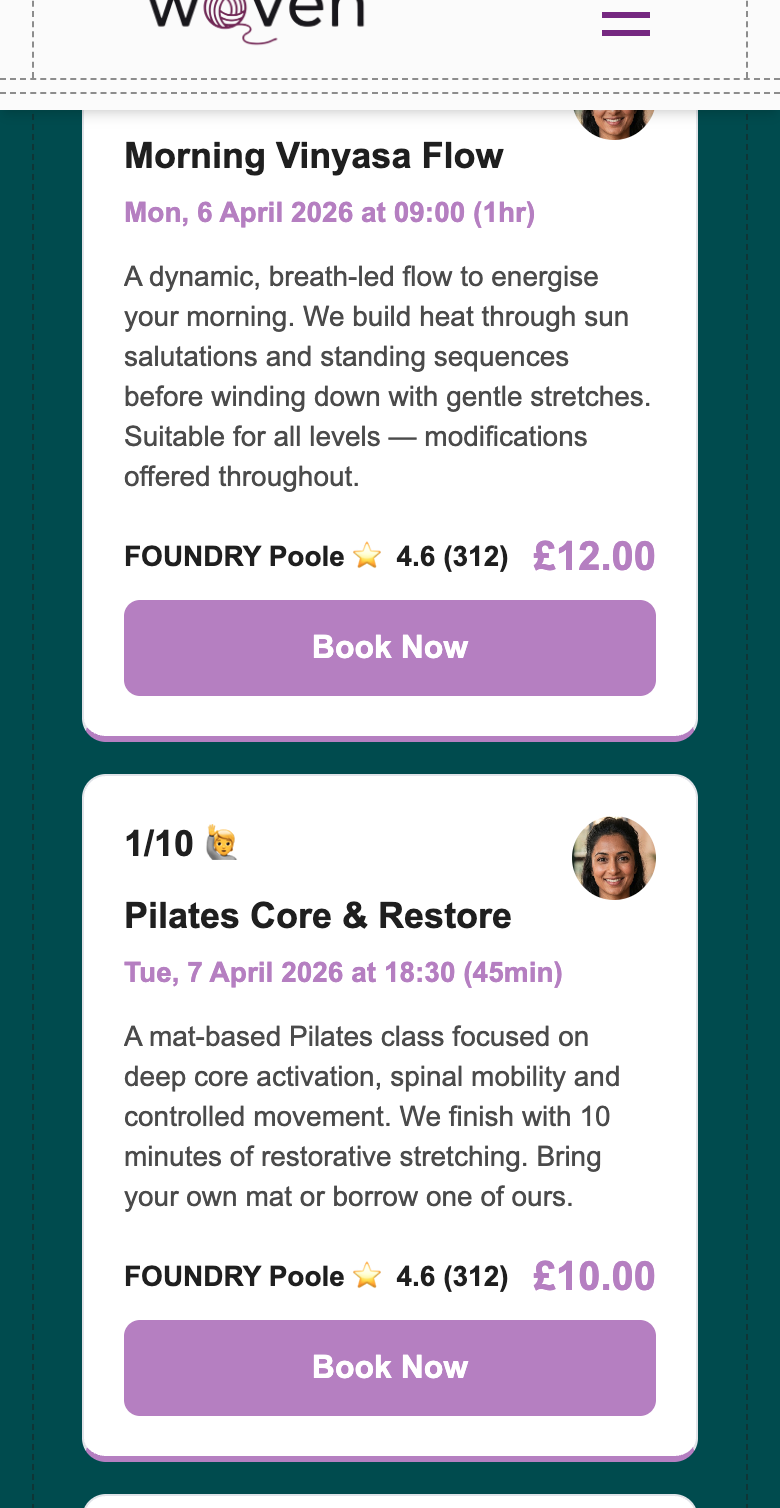
Your client taps on a class, lands on the booking page, and completes three steps:
- Enter their name and phone number — no account, no password, no app download
- Pay by card — Stripe Checkout handles payment securely. Accepts all major cards plus Apple Pay
- Receive WhatsApp confirmation — automatically sent after payment, with the class name, date, time, and location
The whole flow takes under a minute. No friction, no drop-off. The first time a client books, Woven automatically creates a client record for them — you don’t need to do anything manually.
If a class is full, clients see a message and are redirected to your public page to browse other sessions.
For the full client-side walkthrough, see How Online Booking Works for Your Clients.
Step 5: Go Live — Share Your Booking Link
You’re set up. Now you need to put the link in front of your clients.
Your main booking page URL is thankswoven.com/marketplace/business/your-business-slug. Every individual class also has its own shareable link — find it from the class detail view in your admin.
Where to Share
Clients won’t find your booking page unless you show them where it is. Reach them where they already are:
- WhatsApp group or broadcast — the highest-impact first move for most yoga teachers. Drop the link in your client group and say bookings are moving online
- Instagram bio — one link in bio, no friction
- Email signature — every email you send becomes a passive booking prompt
- Your website — add a “Book a Class” button that links directly to your page or a specific class
- Class cards or flyers — a short URL or QR code if you run in-person venues
When you share a class-specific link via WhatsApp or iMessage, it automatically generates a preview showing the class name, date, time, and price. No extra effort needed.
After Go-Live: Track, Learn, Adjust
Once bookings are coming in, your admin becomes your performance dashboard.
From the Upcoming tab, you can see every class, how many spaces are filled, and total revenue at a glance.
From the class detail view, you can see individual bookings: who’s booked, their payment status, and — after the class — their attendance.
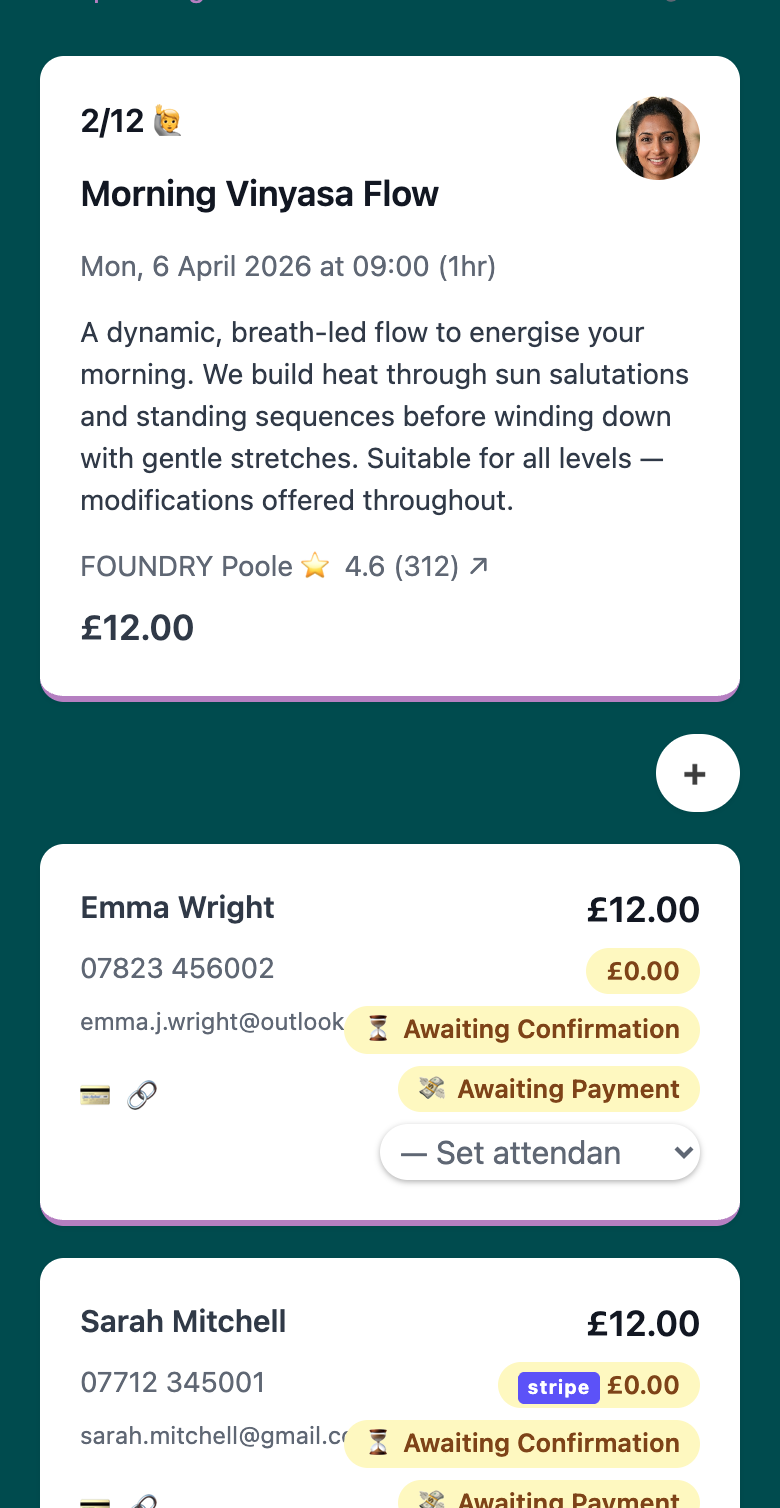
Record attendance after every session. It takes two minutes and gives you data over time: who’s consistent, who’s drifting, which classes fill fastest. Attendance options are: Attended, Attended (Late), No Show (Notified Me), No Show (Unwell), and No Show (No Contact) — the last one flags clients who disappeared without explanation, the most useful for spotting who needs a nudge.
Watch for patterns. Which classes fill first? Which time slots struggle? Which clients haven’t booked in a month? Woven builds your client history automatically — use it.
For a complete guide to tracking clients over time, see Managing Your Clients in Woven.
Tips for Getting the Most from Your Booking System
- Set capacity slightly under your real maximum. A class that fills up signals demand. It also holds space for regulars who book late.
- Name your classes descriptively. “Vinyasa Flow — All Levels” is more bookable than “Thursday Yoga”. Clients decide to book from the class name alone.
- Use class descriptions for level guidance. One sentence on who the class suits (“Good for complete beginners — no prior experience needed”) removes the hesitation for first-timers.
- Share class links, not just your page link. A link to a specific class converts better than your general booking page. When you promote a class, link directly to it.
- Add classes in advance. Give clients a two-to-four week window to plan. Regulars often block-book when they can see the schedule ahead.